3. Usage rule
3.1. Overview
Here indicates basic topic about Supercomputer Fugaku use.
3.2. Use scale/Use environment
Item |
Contents |
|---|---|
Number of computing node |
158,976 |
Language software |
Technical Computing Suite V4.0L20A Development Studio |
Program development |
Login node |
Job submission |
Login node |
Home area |
2nd layer storage system (FEFS) |
Data area |
2nd layer storage system (FEFS) |
3.2.1. Usable job scale
1~82,944 nodes
Usable job scale depends on the resource group.
Please refer to the Fugaku website (Resource group configuration) for resource group.
3.3. Local account management
This indicates about local account management.
To use Supercomputer Fugaku, we explain about Fugaku original local account to login to Fugaku
3.3.1. Login
Login to the system using lodal account is SSH public key authentication.
3.3.2. Authentication by client certification
3.3.3. System project manager responsiblity scope
3.3.4. Update process
3.4. Resource
This indicates the usable number of computing node and disk.
3.4.1. Compute node
The minimum and maximum number of compute nodes that can be specified are different for each resource group.
The maximum value of job shape that can be specified (1D, 2D and 3D) is different for each resource group.
About 2D and 3D, replacement of each axis is possible.
For example, if the maximum value of each axis is 4x6x16, the shape of 16x4x6 is also available.
Node allocation method (noncont, mesh and torus) that can be specified is different for each resource group.
For the resource groups that more than 385 nodes can be used, only torus is availble. The default is torus.
For the resource groups that 384 nodes or less can be used, we provide resource groups that noncont (Default), mesh, and torus are available and resource groups that only torus is available.If mesh or torus is specified, the wait time before running the job is longer than noncont (Default).
Resource groups that include non-contiguous mode (noncont) may be affected by non-contiguous mode jobs even if you specify mesh or torus. Use a resource group that only torus can be specified for strict performance measurements such as benchmark.
Please refer to the Fugaku website (Resource group configuration) for the resource group.
Attention
The job shape has a maximum value for each axis. When submitting a job, you must specify that the maximum value for this axis not be exceeded.
3.4.2. Confirmation of number of job submission
On pjstat command’s --limit option, of the contents that displayed with pjacl command, you can check the resource limit value and the current quota for the user’s job submission.
[Resouce limit value and assign size in the resource unit]
[_LNlogin]$ pjstat --limit
System Resource Information:
RSCUNIT: rscunit_ft01
USER: user1
 LIMIT-NAME                    LIMIT  ALLOC
 ru-accept                       100      0   #1
 ru-accept-allsubjob       unlimited      0   #2
 ru-accept-bulksubjob      unlimited      0   #3
 ru-accept-stepsubjob      unlimited      0   #4
 ru-run-job                unlimited      0   #5
 ru-run-bulksubjob         unlimited      0   #6
 ru-use-node               unlimited      0   #7
 ru-interact-accept        unlimited      0   #8
 ru-interact-run-job       unlimited      0   #9
 ru-interact-use-node      unlimited      0   #10
 ru-use-core               unlimited      0   #11
 ru-interact-use-core      unlimited      0   #12
GROUP: group1
 LIMIT-NAME                    LIMIT  ALLOC
 ru-accept                 unlimited      0
 ru-accept-allsubjob       unlimited      0
 ru-accept-bulksubjob      unlimited      0
 ru-accept-stepsubjob      unlimited      0
 ru-run-job                unlimited      0
 ru-run-bulksubjob         unlimited      0
 ru-use-node               unlimited      0
 ru-interact-accept        unlimited      0
 ru-interact-run-job       unlimited      0
 ru-interact-use-node      unlimited      0
 ru-use-core               unlimited      0
 ru-interact-use-core      unlimited      0
ALL:
 LIMIT-NAME                    LIMIT  ALLOC
 ru-accept                 unlimited      0
 ru-accept-allsubjob       unlimited      0
 ru-accept-bulksubjob      unlimited      0
 ru-accept-stepsubjob      unlimited      0
 ru-run-job                unlimited      0
 ru-run-bulksubjob         unlimited      0
 ru-use-node               unlimited      0
 ru-interact-accept        unlimited      1
 ru-interact-run-job       unlimited      0
 ru-interact-use-node      unlimited      0
 ru-use-core               unlimited      0
 ru-interact-use-core      unlimited      0
Note
Number of batch job acceptance at the same time
Limit number of bulk job and step job’s sub job acceptance at the same time
Limit number of bulk job’s sub job acceptance at the same time
Limit number of step job’s sub job acceptance at the same time
Number of batch job execution at the same time
Limit number of bulk job’s sub job execution at the same time
Number of batch job’s node use at the same time
Number of interactive job acceptance at the same time
Number of interactive job execution at the same time
Number of interactive job’s node use at the same time
Number of batch job’s CPU core use at the same time
Number of interactive job’s CPU core use at the same time
pjstat command’s --limit option displays the following item and contents.
Item
Description
LIMIT-NAME
Limit value name
RSCUNIT
Resource unit name
GROUP
Group name on OS
LIMIT
Limit value
ALLOC
Current assigning value
[About the lower limit setting of resource group]
To resource group, there is the lower limit to the specificable number of node. If specified lower number of node than the lower limit, the following error message displays when executed pjsub and the job cannot be accepted.
The error display when the specification of number of node is lower than the limit is as following.
[_LNlogin]$ pjsub -L "rscgrp=large" sample.sh
[ERR.] PJM 0054 pjsub node=1 is less than the lower limit (385).
3.4.3. How to use resource group
To use a resource group, it is required to specify a resource name.
[Execution command example by resource group small]
[_LNlogin]$ pjsub -L "rscgrp=small" sample.sh
3.4.4. Resource group use status
About the resouce use status on the system, it’s checked with pjshowrsc command.
Attention
If you are using a single account, use the newgrp command to change to an individual issue group (for example, hpxxxxxx) and then run the pjshowrsc command.
Display summary per resource group
If specify
--rscgrpoption without argument, displays about all resource group.[_LNlogin]$ pjshowrsc --rscgrp [ CLST: clst ] [ RSCUNIT: rscunit_ft01 ] RSCGRP NODE TOTAL FREE ALLOC group1 36 24 12 group2 36 24 12 group3 36 24 12
Display summary on specific resource group
If specify resource group name to
--rscgrpoption’s argument, displays specified resource group information.[_LNlogin]$ pjshowrsc --rscgrp group2 [ CLST: clst ] [ RSCUNIT: rscunit_ft01 ] RSCGRP NODE TOTAL FREE ALLOC group2 36 24 12
3.4.5. Disk
This indicates the type of file system.
There are 5 types for the disk area : home area, data area, share area, tmpfs area, and 2ndfs area.
Area
File system
Allocation volume
Home area
Global file system (FEFS,LLIO)
/vol0002,/vol0003,/vol0004,/vol0005,/vol0006
Data area
Global file system (FEFS,LLIO)
same as above
Share area
Global file system (FEFS,LLIO)
same as above
tmpfs area
tmpfs
-
2ndfs area
Global file system (FEFS)
/vol0001
Attention
Fugaku system does not collect user data backups. Data management (backup, etc.) is self-managed by the user.
If you open or close hundreds of thousands of files in a short period of time, the execution node may run out of memory.
Please refrain from the operations 1 to 3 below because they may place a heavy load on the entire file system.
Simultaneous file creation from more than 1000 processes in the same directory
Create more than 100,000 files in the same directory in the home area and data area
The following operations performed simultaneously on the same directory from multiple compute nodes
Create or delete files and directories
Refer to files and directories
Avoid the third one in particular as it can slow down the file system or bring down compute nodes.
Example) Run more than 1,000 small jobs (or processes) in the same directory, then create files and directories during the job or output job results and statistics.
To prevent multiple compute nodes from accessing the same directory simultaneously, the following actions are recommended to make job execution easier.
Separate output directories for each job
Hierarchize directories to separate reference and output directories
About directory name
The home directory, data directory, share directory, and 2ndfs directory are created using the following symbolic link names. In some cases, such as job logs and Fugaku websites, the actual path (path described in the Allocation volume) is displayed.
Home directory :
/home/username/Data directory :
/vol0n0m/data/groupname/Share directory :
/vol0n0m/share/groupname/tmpfs directory :
/worktmp/2ndfs directory :
/2ndfs/groupname/
n:volume number(2~6)m:MDT number(0~7)
Data directory, share directory, and 2ndfs directory assigns to group. Please use with group members. The share directory can be referenced from the above path only from the login node.For 2ndfs, refer to File system.
Use of share area (/vol0n0m/share/groupname/)
An area where you can share data between specific groups and members. Unlike the home area and data area, all users can access under
/vol0n0m/share/groupname/. You are able to create a directory freely for each group or member you want to share.Use of tmpfs area (/worktmp/)
This is a temporary file area accessible only from compute nodes during job execution.The tmpfs area consumes memory (job memory) on the compute node, providing a maximum of 20GiB.Attention
If you need to use temporary files larger than 20GiB, consider using Node Temporary Area.
3.4.5.2. Method of using tmpfs area (/worktmp/)
You can create, read and write files, and start executable files in the same way as a normal file system.
Please note the following points when using.
- An area is allocated for each job. It can be used only from the start of job execution to the end of job execution.It cannot be referenced from another job of the same user or a job of another user.
- An area is assigned on a node-by-node basis. Only available within the same node. It cannot be referenced from other nodes.For example, when executed in 1 node and 4 processes, 4 processes in the same node refer to the same area.
- A capacity of 20GiB is provided.However, the usable tmpfs area depends on the following conditions:
Upper limit of used capacity (approximate) = Maximum amount of job memory - Memory usage by job (1)
If the result of equation (1) is 20GiB or more: 20GiB
If the result of equation (1) is less than 20GiB: The result of equation (1)
For details about the maximum amount of job memory and the amount of memory used by jobs (the amount of memory used by user programs), see Estimating the amount of memory available to user programs .
Attention
Attempting to place files larger than the upper limit of usable capacity into the tmpfs area will result in a write error.
Also, if the sum of “Memory usage by job” and “tmpfs area usage” approaches the “Maximum amount of job memory,” an OOM (Out Of Memory) error may occur.
It is recommended to execute the job once and use it after understanding the maximum memory usage for each node.
3.4.6. File creation and stripe setting
You can set stripe settings for files created in the home area and data area. By performing stripe settings, access to the OST (Object Storage Target) that composes the global file system is distributed and efficient use is possible.
Attention
If a compute node writes a file larger than 1GB in size, use stripe settings to avoid loading a specific OST.
3.4.6.1. Stripe setting
To set a stripe, use lfs setstripe command. This indicates lfs setstripe command style. Please see the manual”FEFS User’s Guide” for more detail.
Style
lfs setstripe [options] <dirname|filename>Option
[--stripe-count | -c stripe_count]Set number of stripe. Specify 1~48.
- <dirname>
Specify an existing directory name. A stripe is set in the directory. After setting, stripe settings are inherited for files and directories created under this directory.
- <filename>
Specify a new file name. Create an empty file with stripes. An existing file cannot be specified. You cannot change the stripe settings of an existing file.
- Stripe setting direction
This section describes the procedure for creating a directory and setting a stripe in the created directory. It is recommended that you use stripes in directories instead of files.
[_LNlogin]$ mkdir <dirname>
[_LNlogin]$ lfs setstripe -c 4 <dirname>
Attention
When you use the lfs command for 2ndfs on the compute node, you must specify the full path /usr/bin/lfs .When you use the lfs command for the second-layer storage cashe on the compute node, you must specify the lfs default path.
3.4.6.2. Confirm stripe
To check stripe, use lfs getstripe command. Please see the manual”FEFS User’s Guide” for more detail.
- How to confirm stripe
Here indicates the steps to check stripe setting of directory and file. Confirm stripe_count or lmm_stripe_count displayed as next.
[_LNlogin]$ lfs getstripe -d <dirname>
<dirname>
stripe_count:   4 stripe_size:    0 stripe_offset:  -1
[_LNlogin]$ lfs getstripe <dirname>/<filename>
<dirname>/<filename>
lmm_stripe_count:   4
lmm_stripe_size:    1048576
lmm_stripe_offset:  ...
        obdidx           objid          objid            group
....
Attention
When you use the lfs command for 2ndfs on the compute node, you must specify the full path /usr/bin/lfs .When you use the lfs command for the second-layer storage cashe on the compute node, you must specify the lfs default path.
3.4.7. File system
Job operation software supports job execution in “tiered storage”. Tiered storage is a file system that has a hierarchical structure with the following first-tier storage and second-layer storage.
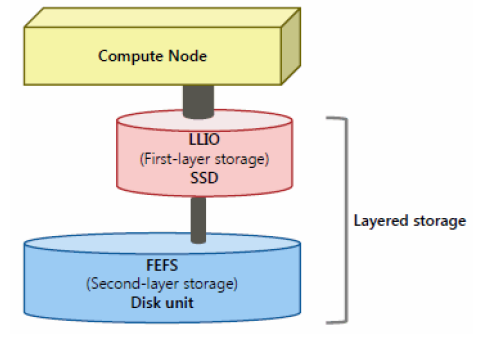
The first-layer storage
The first-layer storage is a high-speed file system using Lightweight Layered IO-Accelerator (LLIO) technology. first-layer storage is sometimes called LLIO. In tiered storage, it is this first-layer storage that can be accessed directly from the compute nodes.
For the first-layer storage, there are 3 type of areas.
- Temporary area in node
The local area that can be used on each computing node that is assigned to job.
- Shared temporary area
The area that assigned to node and is able to share within nodes. If it is the same job process, accessable from any computing nodes.
- The second-layer storage cashe
Although it appears as a second-layer storage to the job, internally it accesses the second-layer storage cache on the first-layer storage instead of directly accessing the second-layer storage. A temporary work area in the node and a shared temporary area are reserved for each job, and can be used only by that job. These areas are reserved at the start of the job and are deleted when the job ends.
See also
About the first-layer storage’s detail, please see the manual “LLIO User’s Guide”.
The second-layer storage
The second-layer storage uses the distributed file system FEFS and is shared by the login node and each computing node. Before submitting a job, the user places files such as job scripts required to execute the job in this file system. Access from the job on the compute node to the second-layer storage is internally to the cache on the first-layer storage.
Home area (/home), data area (/vol0n0m/data), share area (/vol0n0m/share), and 2ndfs area (/2ndfs) is created to the second-layer storage.
2ndfs provides direct access to tier second-layer storage without going through tier first-layer storage.
n:volume number(2~6)m:MDT number(0~7)Disk size/Number of file limit
Item
home area
data + share area
2ndfs area
Size limit
20GiB/User
5TiB/Group
5TiB/Group
Number of file limit
200K/User
1.5M/Group
1.5M/Group
Block size
4KiB
4KiB
4KiB
Stripe count
1
1
1
Strpe size
1MiB
1MiB
1MiB
The /vol0002 area is intended to be used for issues that require particularly large use of i-nodes. A permission system will be applied to use the system for tasks appropriate to each field. Please describe the reason why you use a large number of inodes at the time of application. Group that are not being used in accordance with the investment policy in this area may be discontinued and a request to move to a normal area may be made.
Disk size/Number of file limit
Item
data + share area(/vol0002)
Size limit
5TiB/Group
Number of file limit
9.0M/Group
Block size
4KiB
Stripe count
1
Strpe size
1MiB
Please check herefor the application.
See also
Please see the manual “FEFS User’s Guide” for more detail about FEFS.
3.4.7.1. Client cache of the compute node and IO peformance
In the compute node, the client cache used for I/O is limited to 128MiB, Therefore, if a record length is greater than 128MiB, the read performance for files on the second-layer storage can be severely degraded. When you design I/O or migrate from other systems, you should set the length of a record to be less than or equal to 128MiB.
C/C++
Adjust the read size in user programs. For example, when using fread, set the arguments so that size*num should be less than or equal to 128MiB:
fread(buf, size, num, fp);
Fortran
The record length depends on the I/O buffer size of Fortran. By default, this I/O buffer size is 8MiB and such case does not have the problem with client cache. If you specify the I/O buffer size at runtime using the -Wl,-g option, for instance, set the vlaue to be less than or equal to 128MiB.
Also, if you unzip a file larger than 128MiB using gzip/gunzip, it may take a long time to wait for the cache output. If you unzip a large number of files on the second-layer storage, consider using a login node with a large client cache.
3.4.8. Group
You must specify a group ID when you submit a job.
Example: userinfo command
[_LNlogin]$ userinfo | grep groupList
groupList=hp210xxx,hp220xxx,fugaku
If multiple group IDs are displayed and you can not know the group ID that corresponds to the target Project ID, please ask the Project manager.
The group list may contain 'fugaku', where 'fugaku' is the group ID to which all single accounts belong.
You can not specify 'fugaku' as a group ID when you submit a job.
Example job script
[_LNlogin]$ cd /vol0n0m/data/groupname/username

[_LNlogin]$ vi jobscript
#!/bin/bash
#PJM -L "node=4"
#PJM -L "rscgrp=small"
#PJM -L "elapse=1:00:00"
#PJM --mpi "max-proc-per-node=4"
#PJM -x PJM_LLIO_GFSCACHE=/vol0005
#PJM -g groupname
3.4.9. Type of parallel job
With Supercomputer Fugaku, computing program executes as job unit. Jobs are classified into single node jobs and multi node jobs according to the number of nodes required.
- Mult node jobThe job that executes by using the multiple computing nodes. This applies to process parallel programs that cross nodes.
- Single node jobThe job that executes on 1 device computing node. Sequential job becomes single node job. A parallel job is one that uses multiple processes or threads within a node.
3.4.10. Login node
ulimit command execution example
[_LNlogin]$ ulimit -a
core file size          (blocks, -c) unlimited
data seg size           (kbytes, -d) unlimited
scheduling priority             (-e) 0
file size               (blocks, -f) unlimited
pending signals                 (-i) 377308
max locked memory       (kbytes, -l) unlimited
max memory size         (kbytes, -m) unlimited
open files                      (-n) 1024
pipe size            (512 bytes, -p) 8
POSIX message queues     (bytes, -q) 819200
real-time priority              (-r) 0
stack size              (kbytes, -s) 8192
cpu time               (seconds, -t) 604800
max user processes              (-u) 4096
virtual memory          (kbytes, -v) 41943040
file locks                      (-x) unlimited
If you are using more than the following resources per Fugaku Login Node, please consider running jobs on multiple Fugaku Login Nodes, Pre/Post Environment, or Fugaku compute nodes.
Resource |
available |
|---|---|
number of threads |
8 threads |
Memory capacity |
12GiB |
See also “Notes on using the Fugaku Login Node” on the Fugaku website.
3.4.11. I/O node
In the supercomputer Fugaku, some of the computing node serve as the I/O node.
There are three types of I/O nodes.
- BIO(Boot I/O node)
I/O node that acts as the boot server of nodes. There is 1 node in 16 nodes(1BoB).
- SIO(Storage I/O node)
I/O node responsible for input/output for first-layer storage The storage I/O node is connected to a disk drive (SSD) composing first-layer storage. There is 1 node in 16 nodes(1BoB).
- GIO(Global I/O node)
Node for relaying input/output for second-layer storage(FEFS). There is 1 node in 192 nodes.
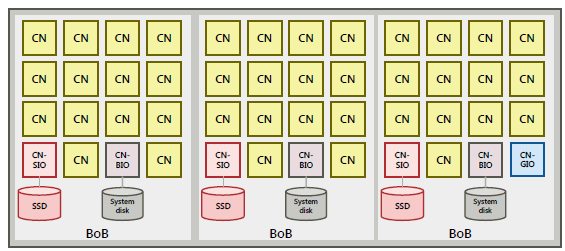
Placement overview of the I/O node
The CPU frequency of the I/O node is fixed to 2.2 GHz.
You can identify the I/O node from NODE ID output in the job statistics information.
The method of identifying the I/O node
Please refer to ‘job Operation Software Overview’ to see the function of BIO,SIO,GIO,BoB.
An idcheck command is provided to display the I/O node from the NODE ID on the login node.
The command with the
-hoption shows help menu[_LNlogin]$ idcheck -h Usage: idcheck [OPTION]... -h Display help -n nodeid[,...] Search node type from node ID -f <FILE> This option executes the process for node IDs written in the file that is specified by filename. [Example] 0x01010001 0x01010002 0x01010003 0x01010004
The
-noption, followed by single NODEID or multiple NODEIDs separated by ‘,’ shows each node information as follows.[_LNlogin]$ idcheck -n 0x01010001,0x01010002,0x01010003,0x01010004 0x01010001 BIO 0x01010002 SIO 0x01010003 GIO 0x01010004 CN
The
-foption, followed by a filename that describes NODEIDs shows each node information as follows.[_LNlogin]$ cat aaa 0x01010001 0x01010002 0x01010003 0x01010004 [_LNlogin]$ idcheck -f aaa 0x01010001 BIO 0x01010002 SIO 0x01010003 GIO 0x01010004 CN
3.4.12. Estimating the amount of memory available to user programs
With Supercomputer Fugaku, the system sets an upper limit on the amount of job memory a job can use on a node.
NodeType |
Maximum amount of job memory(byte) |
|---|---|
BIO/SIO/GIO |
30,739,267,584 |
CN |
30,739,333,120 |
The amount of memory available to the user program is as follows:
Estimate fomula:
AM = MJM - MPI

  AM  : Amount of memory that can be used by the application per node (byte)
  MJM : Maximum amount of job memory (byte)
  MPI : Amount of memory that used by MPI (byte)
For information about estimating memory usage for MPI libraries, refer to the “6.11 Memory Usage Estimation Formulae and Tuning Guidelines” in the Development Studio MPI User’s Guide.
3.4.13. Definition of used computational resource

# of assigned nodes to n-th job
In case of jobs with less than 385 nodes, # of assigned nodes varies by specified node allocation mode.
torus : node allocation unit is 12 nodes (2*3*2). Therefore, a job may have more nodes than you specified when you submitted the job.
mesh : # of nodes needed to make specified mesh pattern is assigned to the job. Therefore, a job may have more nodes than you specified when you submitted the job.
noncont(default) : Specified # of nodes is assigned to the job. Adjacent nodes may not always be allocated to the jobs. thus, inter-node communication may be disturbed by other jobs.
In case of jobs with more than 384 nodes, node allocation unit is 48 nodes (2*3*8). Therefore, # of assigned nodes is sometimes larger than # of requested nodes. You can minimize # of unused nodes by requesting nodes consisting of 48 nodes (2*3*8). The job can occupy the 1st layer storage that assigned to it.
# of assigned nodes varies when you submit job because the scheduler allocates nodes to job with rotation depending on scheduling status. You can prevent this rotation using
:strictoption, but the start time of job may be postponed. Jobs that do not have noncont enabled are affected by rotation.
The number of nodes that the scheduler has allocated to a job can be viewed with the pjstat -v --choose jid,nnuma command or with the Job Statistical Information NODE NUM (ALLOC).
[Example of pjstat command display]
[_LNlogin]$ pjstat -v --choose jid,nnuma
JOB_ID     NODE_ALLOC
13132535   432:6x9x8
14049234   216
Elapsed time of n-th job
Attention
Used computational resource will NOT be refunded under any condition.